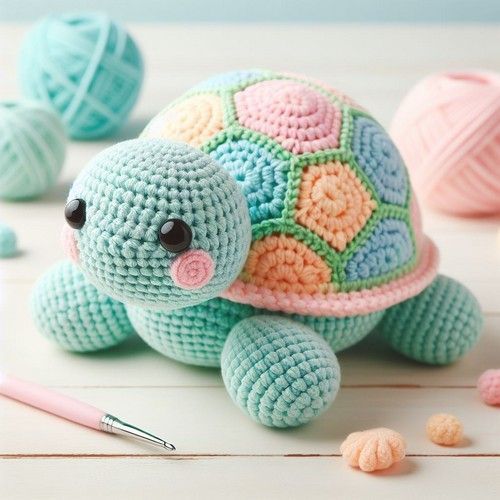
Crochet Turtle (Free Pattern) is a delightful and creative project that brings together simplicity, charm, and the joy of handmade crafts. From the very first stitch, this adorable turtle design captures attention with its rounded shell, tiny legs, and sweet expression. Whether you are crafting for yourself, preparing a thoughtful handmade gift, or adding a new item to your crochet collection, this project offers both relaxation and satisfaction.
When working on a Crochet Turtle (Free Pattern), you enter the comforting world of amigurumi, where yarn transforms into personality-filled creations. Turtles are especially popular in crochet because their shapes are friendly and forgiving, making them ideal for beginners while still enjoyable for experienced crocheters. The rounded body and textured shell provide opportunities to practice shaping techniques and stitch consistency.
In addition, this guide is designed to be easy to follow while maintaining strong SEO structure and clarity. The Crochet Turtle (Free Pattern) will be explained in detail, including materials, step-by-step structure, customization ideas, and helpful beginner tips. By the end of this article, you will feel confident starting your own turtle project and adding your personal creative touch.
Materials and Tools for Crochet Turtle (Free Pattern)
Choosing the right materials is the first step toward a successful Crochet Turtle (Free Pattern). Yarn selection plays a significant role in the final appearance of your turtle. Cotton yarn is excellent for maintaining structure and stitch definition, while acrylic yarn provides softness and vibrant color options. Both are suitable depending on your preference and intended use.
The crochet hook size should match your yarn weight but is often slightly smaller than recommended for tighter stitches. Amigurumi projects like the Crochet Turtle (Free Pattern) benefit from firm stitches because they prevent stuffing from showing through. A hook between 2.5 mm and 3.5 mm typically works well for small to medium turtles.
You will also need polyester fiberfill stuffing. This material helps give your turtle its rounded body and dimensional shell. Add stuffing gradually while shaping the body to ensure even distribution and avoid lumps. Proper stuffing creates a smooth and balanced look.
A yarn needle is necessary for assembling the different parts, such as the head, legs, tail, and shell. Careful stitching during assembly ensures durability and symmetry. Take your time when attaching each piece to maintain a polished result.
Safety eyes or embroidered eyes can be used to give your turtle character. If the turtle is intended for children, embroidery is a safer alternative. Small details like a stitched smile can transform your Crochet Turtle (Free Pattern) into a charming and expressive creation.
Finally, stitch markers and sharp scissors are essential tools. Stitch markers help track rounds, especially when working in continuous spirals. This simple tool prevents mistakes and keeps your turtle evenly shaped.
Step-by-Step Construction of Crochet Turtle (Free Pattern)
The Crochet Turtle (Free Pattern) typically begins with the shell, as it forms the turtle’s most recognizable feature. Start with a magic ring and work in increasing rounds to create a flat circular base. Evenly spaced increases help maintain a smooth and symmetrical shape.
After reaching the desired width, you may add texture to the shell. Some patterns incorporate raised stitches or color changes to mimic natural shell patterns. These small design elements elevate your Crochet Turtle (Free Pattern) and add visual interest.
The body is often crocheted separately or as an extension of the shell. Using gradual increases and decreases shapes the turtle’s rounded underside. Maintaining consistent tension is important during this stage to keep the form balanced.
The head is usually worked in rounds, starting with a magic ring and increasing to form a soft oval shape. Before closing the head, insert stuffing and position the eyes evenly. Proper placement of facial features brings personality to your turtle.
Legs and tail are small components crocheted separately. They are typically simple rounded shapes that are lightly stuffed. Attach them symmetrically to ensure your Crochet Turtle (Free Pattern) sits evenly and looks proportionate.
Finally, assemble all parts carefully using a yarn needle. Secure stitching ensures durability, especially if the turtle will be handled frequently. Once assembled, your crochet turtle will have a charming three-dimensional form.
Customization Ideas for Crochet Turtle (Free Pattern)
One of the most enjoyable aspects of a Crochet Turtle (Free Pattern) is the ability to customize it. You can experiment with different shell colors, from natural greens and browns to playful pastel tones. Unique color combinations make each turtle special.
Texture variation is another creative approach. Adding bobble stitches or surface embroidery on the shell can create a decorative pattern. These details give depth and individuality to your project.
Size adjustments are simple to achieve. Using thicker yarn and a larger hook creates a bigger turtle, while fine yarn results in a miniature version. The flexibility of the Crochet Turtle (Free Pattern) makes it adaptable for keychains, nursery décor, or plush toys.
You can also personalize the turtle’s expression. Embroidering curved smiles, sleepy eyes, or cheerful eyebrows changes the mood of the design. Small facial changes can completely transform the character.
Seasonal themes offer additional inspiration. Create soft pastel turtles for spring or deeper earthy tones for autumn. The versatility of the Crochet Turtle (Free Pattern) allows it to fit various occasions and gifting needs.
Adding accessories like tiny bows, miniature hats, or embroidered initials makes your turtle even more unique. Personal touches turn a simple crochet project into a meaningful handmade keepsake.
Beginner Tips for Crochet Turtle (Free Pattern)
If you are new to amigurumi, practice basic stitches before starting the Crochet Turtle (Free Pattern). Mastering single crochet, increase, and decrease stitches will make the process smoother and more enjoyable.
Always count your stitches at the end of each round. Small miscounts can distort the turtle’s shape. Using stitch markers helps track progress and maintain consistent shaping.
Keep your tension steady throughout the project. Uneven tension may create gaps or loose areas. Relax your hands and take breaks if necessary to maintain smooth stitches.
Stuff gradually rather than all at once. This ensures even distribution and prevents overstuffing. A well-balanced amount of fiberfill helps your turtle maintain its rounded appearance.
When sewing parts together, pin them in place first to check alignment. Proper positioning improves symmetry and gives your Crochet Turtle (Free Pattern) a professional look.
Most importantly, be patient with yourself. Crochet skills improve with practice. Each turtle you complete will reflect your growing confidence and creativity.
FAQ About Crochet Turtle (Free Pattern)
Is the Crochet Turtle (Free Pattern) suitable for beginners?
Yes, it is beginner-friendly as long as you understand basic crochet stitches and can follow simple amigurumi instructions.
How long does it take to complete a crochet turtle?
Depending on your experience and the size of the turtle, it may take between three to six hours.
What type of yarn works best for this pattern?
Cotton and acrylic yarn are both excellent choices. Cotton provides structure, while acrylic offers softness.
Can I wash my crochet turtle?
Hand washing is recommended to preserve shape and prevent damage to stuffing or decorative elements.
How can I make the turtle larger?
Use thicker yarn and a larger hook, and adjust stitch counts proportionally if necessary.
Is it possible to sell turtles made from this free pattern?
In many cases, handmade items can be sold in small quantities, but always ensure you follow any pattern usage guidelines.
Conclusion
Creating a Crochet Turtle (Free Pattern) is a rewarding experience that combines creativity, technique, and personalization. Throughout this guide, we explored materials, construction steps, customization options, and beginner tips to help you craft a charming turtle with confidence. Each stage of the process contributes to building your crochet skills while producing a delightful handmade piece.
Now it’s your turn to bring your turtle to life with your favorite colors and personal touches. If you found this article helpful, please leave your honest opinion and share your suggestions. Your feedback inspires creativity and helps strengthen a supportive crochet community. Happy crocheting!