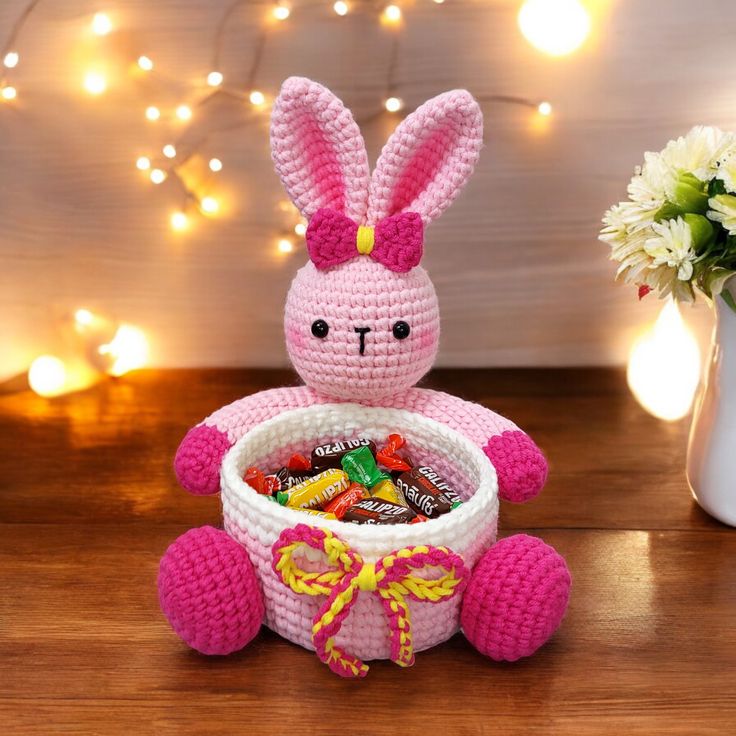
Amigurumi Easter Basket – FREE Crochet Pattern is the perfect seasonal project for anyone who loves combining creativity with meaningful handmade gifts. From the very first stitch, this charming design captures the joy of spring, renewal, and celebration. Whether you are preparing decorations for Easter, creating thoughtful gifts for children, or simply enjoying a relaxing crochet session, this project offers both beauty and functionality in one delightful piece.
Creating an Amigurumi Easter Basket – FREE Crochet Pattern allows you to explore texture, shaping, and color in a compact and rewarding design. Unlike traditional baskets made from stiff materials, a crochet version feels soft, customizable, and full of personality. The small size makes it ideal for holding chocolate eggs, tiny toys, or decorative flowers, adding a handmade touch to your seasonal décor.
In this detailed guide, you will learn how to approach the Amigurumi Easter Basket – FREE Crochet Pattern step by step. We will cover essential materials, construction techniques, customization ideas, and helpful beginner tips. The goal is to help you confidently complete your project while understanding the creative possibilities behind each stitch.
Materials and Tools for Amigurumi Easter Basket – FREE Crochet Pattern
Choosing the right materials is essential for a successful Amigurumi Easter Basket – FREE Crochet Pattern. Yarn selection plays a major role in the basket’s structure and durability. Cotton yarn is highly recommended because it provides firmness and helps the basket maintain its shape. Acrylic yarn can also work well if you crochet tightly and reinforce the base.
Selecting the appropriate crochet hook is equally important. For amigurumi projects, using a hook slightly smaller than the yarn label suggests creates tighter stitches. Tight stitches prevent gaps and ensure that stuffing or inner structure remains hidden. A hook between 3.0 mm and 4.0 mm works well for most medium-weight yarns.
You will also need a yarn needle for weaving in ends and sewing components, especially when attaching the basket handle. Clean finishing techniques give the Amigurumi Easter Basket – FREE Crochet Pattern a professional appearance. Sharp scissors and stitch markers will help you maintain precision throughout the project.
If you want a firmer basket, consider adding a small piece of plastic canvas or a cardboard circle inside the base. This optional reinforcement helps the basket stand upright. It is particularly useful if the basket will hold small treats or decorative items.
Polyester fiberfill is not always required unless your design includes decorative elements like mini eggs or bunnies attached to the basket. However, having a small amount available can help shape certain details if desired.
Finally, choose soft pastel yarn colors such as light pink, baby blue, lavender, mint green, or creamy yellow. These shades reflect the cheerful atmosphere of spring and enhance the visual appeal of your Amigurumi Easter Basket – FREE Crochet Pattern.
Step-by-Step Construction of Amigurumi Easter Basket – FREE Crochet Pattern
The base of the Amigurumi Easter Basket – FREE Crochet Pattern typically begins with a magic ring. Working in continuous rounds, you will gradually increase stitches to create a flat circular base. Even increases ensure that the base remains smooth and symmetrical.
Once the base reaches the desired width, you will stop increasing and begin working in straight rounds. This forms the basket’s sides. Crocheting without increases causes the piece to naturally curve upward, creating the bowl shape that defines the basket.
Maintaining consistent tension during this stage is crucial. Loose stitches may cause the basket to collapse, while tight and even stitches help it hold its structure. The Amigurumi Easter Basket – FREE Crochet Pattern benefits from firm stitching to maintain durability.
The handle is usually crocheted separately using rows or chains reinforced with single crochet stitches. The handle should be sturdy but flexible. Once completed, sew it securely to opposite sides of the basket to balance the weight evenly.
Some designs incorporate decorative edging around the rim. This can include scalloped stitches or simple slip-stitch borders for a clean finish. These small details elevate the overall look of your Amigurumi Easter Basket – FREE Crochet Pattern.
Finally, inspect the basket for loose ends and reinforce attachment points. Proper finishing ensures that your basket remains strong and presentable throughout the Easter season and beyond.
Creative Customization Ideas for Amigurumi Easter Basket – FREE Crochet Pattern
One of the most enjoyable aspects of the Amigurumi Easter Basket – FREE Crochet Pattern is personalization. You can experiment with color combinations to match your home décor or gift theme. Soft gradient yarn can create a subtle color transition effect for a unique look.
Adding appliqués such as tiny crocheted flowers, butterflies, or miniature eggs enhances the basket’s charm. These decorative elements can be sewn onto the sides for a playful and festive appearance.
You may also incorporate textured stitches like bobble stitches or front post stitches to give the basket a woven effect. Texture adds visual interest and makes your Amigurumi Easter Basket – FREE Crochet Pattern stand out.
For children, consider attaching a small amigurumi bunny to the front of the basket. This adds character and transforms the basket into a keepsake item. Handmade details increase sentimental value.
Personalized initials can also be embroidered onto the basket. This makes the project perfect for Easter gifts or family celebrations. Customized designs are always appreciated and memorable.
Seasonal adaptations are another creative option. While designed for Easter, the basket can be adapted for other occasions by changing colors and decorations. This flexibility makes the Amigurumi Easter Basket – FREE Crochet Pattern a versatile addition to your crochet collection.
Beginner Tips for Success with Amigurumi Easter Basket – FREE Crochet Pattern
If you are new to amigurumi, practice the magic ring technique before starting the Amigurumi Easter Basket – FREE Crochet Pattern. This foundational method creates a tight and neat center for the base.
Always count your stitches at the end of each round. Accurate stitch counting prevents uneven shaping and ensures the basket remains symmetrical. Stitch markers can simplify this process.
Maintain steady tension throughout your work. Inconsistent tension can cause the basket walls to lean or warp. Relaxed and consistent stitching produces a cleaner finish.
If the basket feels too soft, consider using a smaller hook to tighten stitches. Adjusting your tools can significantly improve structure and stability.
Secure the handle with multiple reinforced stitches. Since the handle will carry weight, durability is important. Double-check attachment points for extra strength.
Most importantly, enjoy the creative process. The Amigurumi Easter Basket – FREE Crochet Pattern is designed to be both fun and practical. Each completed basket builds your confidence and crochet skills.
About Amigurumi Easter Basket – FREE Crochet Pattern
Is the Amigurumi Easter Basket – FREE Crochet Pattern suitable for beginners?
Yes, it is beginner-friendly if you understand basic stitches like single crochet and increases.
How long does it take to complete the basket?
Depending on size and experience, it usually takes between three to five hours.
What yarn is best for structure?
Cotton yarn is ideal because it provides firmness and helps the basket hold its shape.
Can I wash the crochet basket?
Hand washing is recommended. Allow it to air dry while reshaping it gently.
How can I make the basket sturdier?
Use tighter stitches, a smaller hook, or insert a plastic canvas base for reinforcement.
Can I use this pattern for gifts?
Absolutely. The Amigurumi Easter Basket – FREE Crochet Pattern makes a thoughtful and personalized handmade gift.
The Amigurumi Easter Basket – FREE Crochet Pattern is a delightful and versatile project that combines creativity with seasonal charm. Throughout this guide, we explored materials, construction techniques, customization ideas, and beginner-friendly tips to help you successfully create your own crochet basket. By focusing on structure, detail, and personalization, you can craft a beautiful piece that celebrates the joy of spring.
Now it’s your turn to bring your Easter basket to life with your favorite colors and creative touches. If you enjoyed this guide, please share your honest opinion and suggestions. Your feedback helps inspire future patterns and strengthens our crochet community. Happy crocheting!