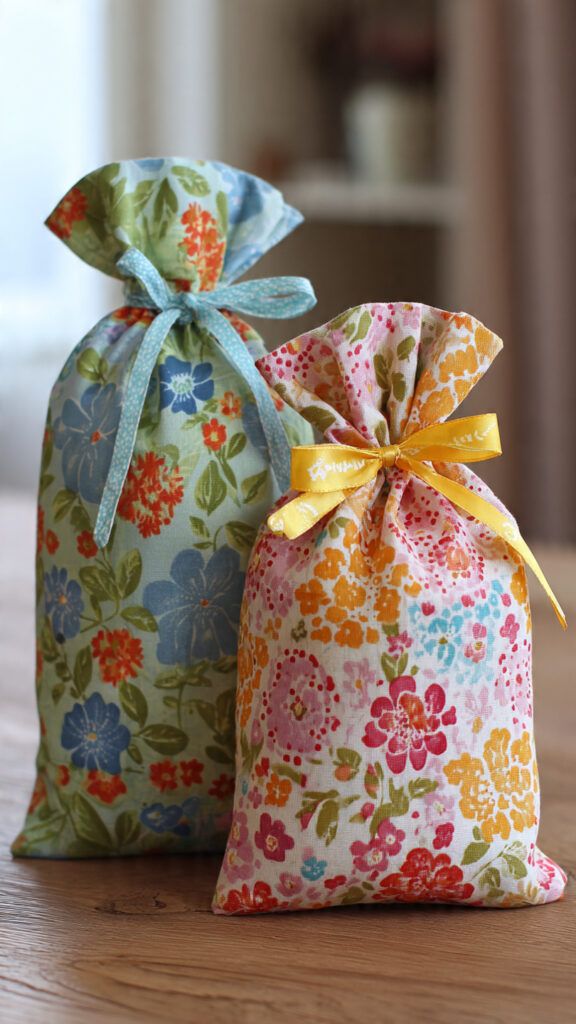
Cute Fabric Gift Bag – Tutorial is the perfect project for anyone who loves handmade details and thoughtful gift presentation. Creating a reusable fabric bag instead of using disposable paper wrapping is not only eco-friendly but also adds a personal and charming touch to any occasion. In this complete Cute Fabric Gift Bag – Tutorial, you will learn how to design, sew, and customize a beautiful bag that can be used for birthdays, holidays, baby showers, or simple everyday surprises. This guide is structured to be beginner-friendly while still offering valuable tips for experienced sewists.
When you follow a well-explained Cute Fabric Gift Bag – Tutorial, you gain more than just a finished project. You develop practical sewing skills, improve your understanding of fabric handling, and explore creative design possibilities. Fabric gift bags are versatile, durable, and reusable, making them a sustainable alternative to traditional gift wrap. With the right materials and techniques, you can create a polished and professional-looking result that reflects your style.
Another advantage of this Cute Fabric Gift Bag – Tutorial is its adaptability. You can easily adjust the size, fabric type, and closure style depending on the gift you plan to wrap. Whether you are packaging small jewelry items or larger clothing pieces, the structure of the bag can be customized to meet your needs. Throughout this article, you will discover step-by-step instructions, expert tips, and creative ideas to make your fabric gift bag truly special.
Materials and Preparation for a Cute Fabric Gift Bag – Tutorial
Choosing the right materials is the foundation of a successful Cute Fabric Gift Bag – Tutorial. Cotton fabric is one of the most popular choices because it is easy to sew and widely available in various prints and colors. Lightweight cotton works well for smaller bags, while medium-weight cotton provides extra durability for heavier gifts.
Before cutting your fabric, it is essential to prewash and iron it. Prewashing prevents future shrinkage and ensures that the finished bag maintains its shape after washing. Ironing removes wrinkles and helps you achieve precise cuts and clean seams, which are important for a polished look.
In addition to fabric, you will need matching thread, sharp fabric scissors or a rotary cutter, pins or clips, and a sewing machine. If you prefer a drawstring closure, include ribbon or cord in your supplies. All these tools contribute to a smooth sewing experience.
Measuring correctly is another crucial step in this Cute Fabric Gift Bag – Tutorial. Determine the size of the gift and add extra inches for seam allowance and ease. This ensures the bag will comfortably hold the item without straining the seams.
You may also consider adding interfacing if you want more structure. Interfacing reinforces the fabric and helps the bag stand upright. This is especially useful for gift bags that will hold boxed items or heavier objects.
Finally, prepare your workspace. A clean and organized sewing area allows you to focus on accuracy and creativity. Proper preparation saves time and reduces mistakes during the sewing process.
Step-by-Step Sewing Guide for a Cute Fabric Gift Bag – Tutorial
The construction process in this Cute Fabric Gift Bag – Tutorial is simple and approachable. Start by cutting two rectangular pieces of fabric in your desired size. These pieces will form the front and back of the bag. Ensure both pieces are identical to maintain symmetry.
Place the fabric pieces right sides together. Pin or clip the edges to keep them aligned. Sew along both sides and the bottom edge, leaving the top open. Use a consistent seam allowance, typically about half an inch, for strong and even seams.
To prevent fraying, finish the raw edges with a zigzag stitch or serger if available. This step enhances durability and gives your bag a professional finish. Even beginners can achieve neat results with careful stitching.
Next, create a hem at the top opening. Fold the top edge down about half an inch, press with an iron, then fold again and stitch in place. This double-fold hem provides a clean edge and strengthens the opening of the bag.
If you are adding a drawstring, fold a slightly wider hem to create a casing. Stitch around the lower edge of the fold, leaving a small opening to thread the ribbon or cord through. This detail adds both functionality and charm to your Cute Fabric Gift Bag – Tutorial project.
Finally, turn the bag right side out and gently push out the corners for a crisp shape. Press the bag once more to remove any wrinkles. Your fabric gift bag is now ready to be filled and gifted.
Creative Customization Ideas for a Cute Fabric Gift Bag – Tutorial
Personalization is one of the most enjoyable parts of a Cute Fabric Gift Bag – Tutorial. You can choose themed fabrics that match the occasion, such as festive prints for holidays or soft pastels for baby showers. Fabric selection alone can transform the entire look of your bag.
Adding decorative elements like lace, pom-pom trim, or contrasting fabric panels enhances visual interest. Small details can elevate a simple bag into a memorable keepsake. Consider coordinating trims with the main fabric for a harmonious design.
Embroidery is another beautiful way to personalize your bag. You might stitch a name, a meaningful word, or a small design onto the front. This makes the gift bag more special and reusable for the recipient.
You can also experiment with boxed corners to create a flat base. This technique allows the bag to stand upright and accommodate bulkier items. It adds dimension and structure to your Cute Fabric Gift Bag – Tutorial creation.
Mixing patterns and textures offers endless possibilities. Pairing solid fabrics with patterned linings creates a delightful surprise when the bag is opened. Thoughtful combinations add depth and uniqueness.
For a more sustainable approach, consider using fabric scraps from previous projects. Patchwork-style gift bags are eco-friendly and visually charming. This technique reduces waste while showcasing creativity.
Practical Tips for Success with a Cute Fabric Gift Bag – Tutorial
Accurate cutting is essential for a professional finish in this Cute Fabric Gift Bag – Tutorial. Use measuring tools carefully and double-check dimensions before cutting. Precision at this stage prevents uneven seams later.
Take your time when sewing the side seams. Straight stitching improves both appearance and durability. If you are new to sewing, practice on scrap fabric before working on your final pieces.
Pressing seams as you go significantly enhances the final result. Heat and steam help flatten seams and create crisp edges. Skipping this step can make the bag look unfinished.
Choose high-quality thread that matches your fabric. Strong thread prevents breakage, especially when the bag carries heavier items. Reinforcing stress points adds extra reliability.
If you plan to reuse the bag frequently, wash and test it after completion. This ensures the seams hold securely and the fabric maintains its shape. A durable gift bag can be enjoyed for years.
Most importantly, enjoy the creative process. Sewing should be relaxing and rewarding. With each Cute Fabric Gift Bag – Tutorial you complete, your confidence and skill will continue to grow.
About Cute Fabric Gift Bag – Tutorial
What fabric works best for a Cute Fabric Gift Bag – Tutorial?
Cotton fabric is the most recommended option due to its ease of use and durability. Medium-weight cotton provides structure without being difficult to sew.
Is this Cute Fabric Gift Bag – Tutorial suitable for beginners?
Yes, the project is beginner-friendly. Basic sewing skills such as straight stitching and hemming are enough to complete it successfully.
Can I wash a fabric gift bag?
Yes, most cotton gift bags are machine washable on a gentle cycle. Air drying helps preserve shape and color.
How do I choose the right size for my gift bag?
Measure the item you want to place inside and add extra inches for seam allowance and comfort. This ensures a proper fit without stress on the seams.
Can I sell gift bags made from this Cute Fabric Gift Bag – Tutorial?
In most cases, handmade items can be sold, especially if the design is your own adaptation. Always ensure originality in your creations.
How can I make my gift bag look more professional?
Use precise measurements, reinforce seams, press thoroughly, and add decorative details such as trims or embroidery for a refined finish.
In this comprehensive Cute Fabric Gift Bag – Tutorial, you learned how to select materials, measure accurately, sew step by step, and personalize your fabric gift bag creatively. From preparation to finishing touches, each stage contributes to a reusable, eco-friendly, and charming packaging solution. By following these structured instructions and practical tips, you can confidently create beautiful fabric gift bags for any occasion. If you found this guide helpful, please leave your honest opinion and share your suggestions. Your feedback is valuable and helps inspire future creative sewing projects.