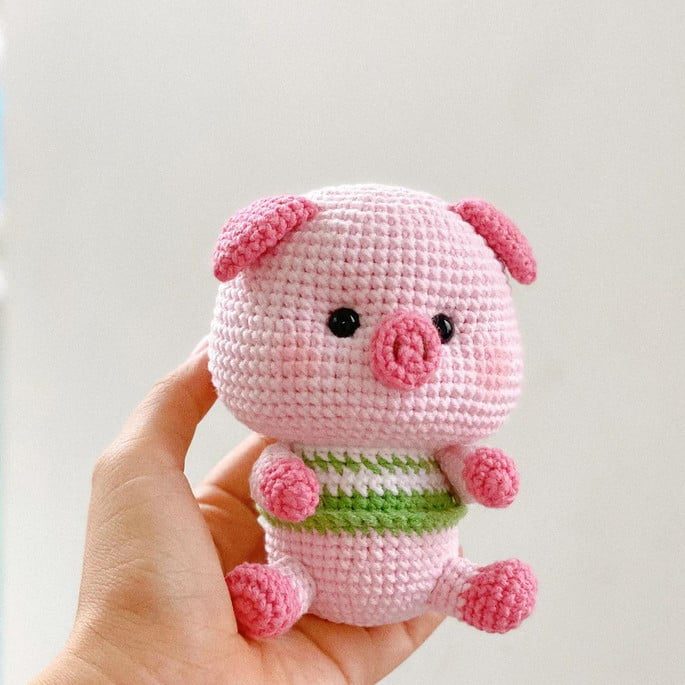
Cute Pig Amigurumi – Tutorial is the perfect guide for crochet lovers who want to create an adorable handmade plush full of charm and personality. From the very first stitch, this project brings together creativity, softness, and the joy of crafting something truly special. Whether you are making it as a gift, nursery decoration, or simply adding to your amigurumi collection, this little pig design is guaranteed to bring smiles.
When following a Cute Pig Amigurumi – Tutorial, attention to detail is what transforms simple yarn into a lovable character. The rounded body, tiny ears, curly tail, and sweet embroidered face all contribute to the final result. With patience and the right techniques, even beginners can successfully complete this project and feel proud of their handmade creation.
In this comprehensive Cute Pig Amigurumi – Tutorial, you will learn about essential materials, step-by-step construction methods, customization ideas, and beginner-friendly tips. This article is structured with SEO best practices in mind, ensuring that the keyword Cute Pig Amigurumi – Tutorial is naturally integrated while maintaining a clear, engaging, and humanized tone throughout.

Materials and Preparation for Cute Pig Amigurumi – Tutorial
Selecting the right yarn is one of the first steps in any Cute Pig Amigurumi – Tutorial. Soft cotton yarn or a high-quality acrylic blend works beautifully for amigurumi projects because they offer good stitch definition and durability. Light pink yarn is commonly used for the pig’s body, while darker pink can highlight details like the snout.
Using a crochet hook slightly smaller than the yarn label recommends helps create tight stitches. Tight stitches are important in amigurumi to prevent stuffing from showing through. For most medium-weight yarns, a hook between 2.5 mm and 3.5 mm provides excellent results.
Polyester fiberfill is ideal for stuffing your pig evenly. Add small amounts gradually as you crochet to maintain smooth shaping. Even stuffing ensures that the head and body stay round and balanced without lumps.
Safety eyes or embroidered eyes can be used depending on preference. If the pig is intended for young children, embroidered eyes are often the safest option. The facial features are essential in giving personality to your Cute Pig Amigurumi – Tutorial project.
A yarn needle is necessary for assembling parts securely. The head, body, legs, ears, and snout are typically crocheted separately and sewn together at the end.
Additional tools such as stitch markers, scissors, and measuring tape help maintain accuracy. Stitch markers are especially useful when working in continuous rounds, which is common in amigurumi patterns.
Step-by-Step Construction of Cute Pig Amigurumi – Tutorial
The Cute Pig Amigurumi – Tutorial usually begins with the head. Start with a magic ring and increase evenly to create a smooth sphere. Consistent tension ensures symmetry and a professional finish.
Before closing the head completely, attach the eyes and embroider the nostrils on the snout. The snout is often crocheted separately in a slightly darker pink and sewn securely onto the face.
The body is typically crocheted in rounds, starting from the base upward. Gradual increases and decreases help form a plump and stable shape that allows the pig to sit upright.
Legs are small cylindrical shapes that can be lightly stuffed for structure. Attach them evenly to maintain balance and prevent the pig from leaning.
The ears are crocheted as small curved pieces and sewn near the top of the head. Proper placement enhances the pig’s cute expression and overall proportions.
Finally, crochet a small curly tail using a simple chain technique. Attach it securely at the back to complete your Cute Pig Amigurumi – Tutorial project.
Customization Ideas for Cute Pig Amigurumi – Tutorial
One of the joys of the Cute Pig Amigurumi – Tutorial is the opportunity for customization. You can experiment with different shades of pink, from soft pastel tones to brighter hues for a playful look.
Adding blush to the cheeks gives your pig a sweet and gentle expression. Lightly applying blush or embroidering small circles enhances its charm.
You may also crochet tiny accessories such as a bow, scarf, or flower. These details personalize your pig and make it suitable for themed gifts or seasonal décor.
Size adjustments are possible by changing yarn weight and hook size. Thicker yarn creates a larger plush toy, while thinner yarn results in a smaller decorative piece.
Facial expressions can be modified through simple embroidery changes. A curved smile or tiny eyebrows can completely transform the pig’s personality.
You can even create a family of pigs in different sizes. This makes the Cute Pig Amigurumi – Tutorial ideal for creative storytelling or nursery decoration.
Beginner Tips for Cute Pig Amigurumi – Tutorial
If you are new to crochet, start by practicing basic stitches like single crochet, increase, and invisible decrease. These stitches form the foundation of the Cute Pig Amigurumi – Tutorial.
Always count your stitches at the end of each round. Consistency ensures that the pig maintains a symmetrical and polished appearance.
Use stitch markers to track rounds when working in spirals. This helps prevent mistakes and uneven shaping.
Stuff gradually rather than all at once. Even stuffing ensures smooth curves and prevents lumps from forming.
When sewing pieces together, pin them in place first to check alignment. Proper placement improves balance and symmetry.
Take your time with details such as embroidery and assembly. Patience leads to a more refined and professional-looking result.
About Cute Pig Amigurumi – Tutorial
Is the Cute Pig Amigurumi – Tutorial suitable for beginners?
Yes, it is beginner-friendly for those familiar with basic crochet stitches and working in the round.
How long does it take to complete the pig?
On average, it takes between four and seven hours depending on skill level and detail.
What type of yarn works best?
Cotton yarn or a soft acrylic blend is recommended for durability and stitch clarity.
Can I wash the finished amigurumi pig?
Hand washing gently with mild soap and air drying is the safest method to preserve its shape.
How can I make the pig larger?
Use thicker yarn and a larger hook while keeping proportions consistent.
Can I customize the design?
Absolutely. You can modify colors, facial expressions, and accessories to create a unique version.
This Cute Pig Amigurumi – Tutorial provides everything you need to create a charming and lovable crochet pig. From selecting the right materials to assembling the final details, each step builds confidence and creativity. By focusing on careful shaping, even stuffing, and thoughtful customization, you can produce a handmade plush that reflects your skill and personal style.
If you enjoyed this guide and found it helpful, please share your honest opinion and suggestions. Your feedback inspires new ideas and helps strengthen the crochet community. Happy crocheting!