

Pie Carrier Sewing Pattern is the perfect project for anyone who loves combining functionality with creativity in the sewing room. Whether you enjoy baking homemade pies for family gatherings or gifting sweet treats to friends, having a reusable and stylish carrier makes transportation safer and more elegant. A well-designed Pie Carrier Sewing Pattern not only protects your baked goods but also adds a handmade charm that disposable packaging simply cannot offer. This article will guide you through everything you need to know to create your own beautiful and durable pie carrier.
When working with a Pie Carrier Sewing Pattern, you are not just sewing fabric together; you are building a practical accessory that reflects your personality and sewing skills. Many crafters appreciate projects that are both beginner-friendly and highly customizable, and this sewing pattern delivers exactly that. From choosing fabrics to understanding structural support, every detail contributes to a finished product that is sturdy, washable, and reusable for years to come.
Creating a pie carrier also aligns with sustainable living practices. Instead of relying on single-use plastic or cardboard containers, you can sew a reusable option that reduces waste while showcasing your craftsmanship. With the right Pie Carrier Sewing Pattern, you can confidently transport pies to potlucks, holidays, picnics, and family dinners without worrying about spills or damage. Let’s explore how to design, construct, and customize your own pie carrier step by step.
Choosing the Right Materials for a Pie Carrier Sewing Pattern
Selecting the correct materials is the foundation of a successful Pie Carrier Sewing Pattern. The fabric you choose should be durable enough to support the weight of a pie dish while remaining flexible and easy to sew. Cotton quilting fabric is a popular choice because it is sturdy, widely available, and comes in endless prints that suit every season and occasion. Heavier cotton blends can also add extra strength.
Interfacing plays a crucial role in reinforcing your pie carrier. A medium to heavy-weight fusible interfacing adds structure and prevents sagging when carrying a full pie. Some sewists prefer adding a layer of batting between fabric layers for extra cushioning and insulation. This added padding helps protect delicate crusts and keeps the pie stable during transport.
Thread selection should not be overlooked. High-quality polyester thread offers durability and resists breaking under tension. Since a Pie Carrier Sewing Pattern involves handles that bear weight, reinforced stitching is essential. Double stitching along stress points increases longevity and ensures safety.
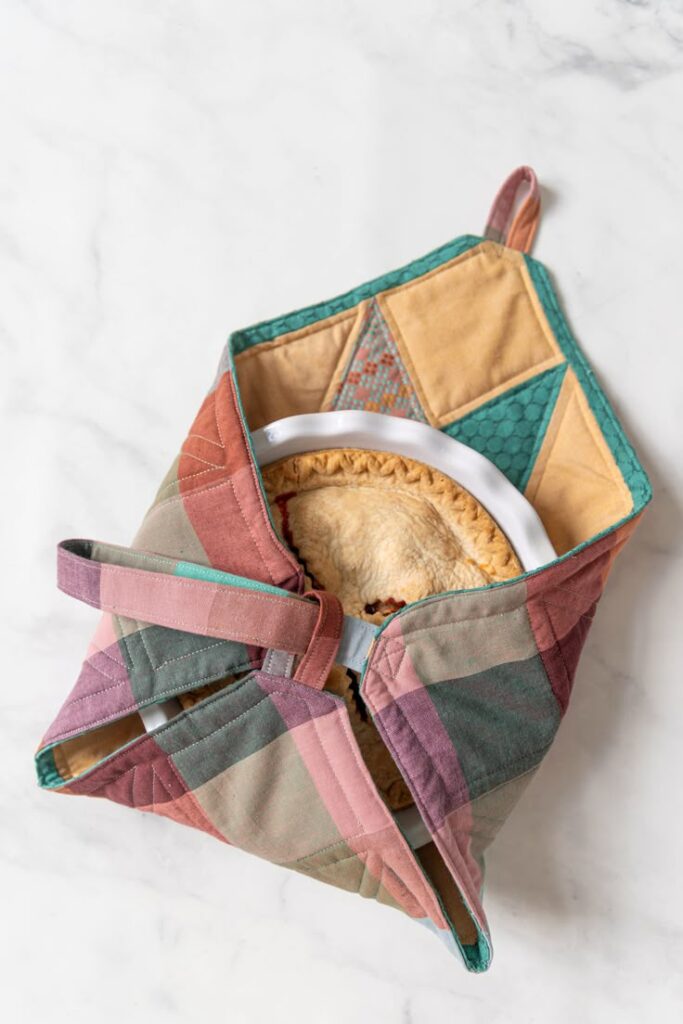
Handles can be made from matching fabric, webbing, or even repurposed materials. Fabric handles create a cohesive aesthetic, while cotton webbing provides additional strength. If you expect to carry heavier pies, consider reinforcing handles with extra interfacing or stitching lines.
Closures are another important detail. Some designs use simple overlapping flaps, while others incorporate Velcro, snaps, or buttons. The closure you choose should secure the pie firmly without complicating access. Practicality and ease of use are key factors.
Finally, always prewash your fabric before beginning your Pie Carrier Sewing Pattern project. Prewashing prevents shrinkage after the carrier is completed and ensures that your finished item maintains its shape and size after cleaning.
Step-by-Step Structure of a Pie Carrier Sewing Pattern
Understanding the basic construction process of a Pie Carrier Sewing Pattern makes the project approachable even for beginners. Most designs begin with measuring the diameter of your standard pie dish. A typical pie dish measures around 9 to 10 inches, so your base fabric piece should allow enough seam allowance and wrapping space.
The base is usually cut as a large square or circle. A square base with extended corners often simplifies handle integration. Accurate cutting ensures symmetry and a professional-looking result. Using a rotary cutter and cutting mat can improve precision significantly.
After cutting your fabric and interfacing, fuse the interfacing to the wrong side of the outer fabric. This step adds the necessary structure before assembly begins. If using batting, layer it between the outer and lining fabric for added support.
Sewing the handles typically comes next. Position the handles symmetrically across the base, ensuring even spacing. Secure them with reinforced stitching, as these seams will bear the pie’s weight. Many Pie Carrier Sewing Pattern designs recommend sewing an “X” box pattern at handle attachment points for extra strength.
Once handles are attached, place the lining and outer fabric right sides together and stitch around the edges, leaving a small opening for turning. After turning the piece right side out, press carefully to create crisp edges. Topstitching around the perimeter enhances durability and adds a polished finish.
The final step involves folding and testing the carrier with an actual pie dish. Adjust the closure method to ensure a snug yet accessible fit. With careful assembly, your Pie Carrier Sewing Pattern transforms into a functional and attractive kitchen accessory.
Customization Ideas for Your Pie Carrier Sewing Pattern
One of the most enjoyable aspects of a Pie Carrier Sewing Pattern is the opportunity for personalization. Seasonal fabrics instantly adapt the carrier for holidays like Thanksgiving, Christmas, or summer picnics. Floral prints, festive motifs, or minimalist designs can all reflect your style.
Embroidery adds a heartfelt touch. Stitching phrases like “Homemade with Love” or adding a simple monogram elevates the project from practical to sentimental. Personalization makes your pie carrier an excellent handmade gift.
You can also experiment with quilted panels. Quilting not only enhances visual appeal but also increases durability and insulation. Straight-line quilting is beginner-friendly, while decorative patterns allow advanced sewists to showcase their creativity.
Adding pockets is another clever modification. Small exterior pockets can hold serving utensils, recipe cards, or napkins. This transforms your Pie Carrier Sewing Pattern into a multifunctional transport solution.
Color coordination between lining and outer fabric creates a cohesive look. Contrasting linings provide a pleasant surprise when the carrier is opened. Thoughtful fabric combinations elevate the overall aesthetic.
Lastly, consider adjusting the size to accommodate different dish shapes. While most patterns focus on round pie dishes, you can modify measurements for rectangular baking dishes or tart pans. Flexibility is one of the strengths of a well-designed Pie Carrier Sewing Pattern.
Tips for Beginners Working with a Pie Carrier Sewing Pattern
If you are new to sewing, start with a simple Pie Carrier Sewing Pattern that uses straight seams and minimal hardware. Avoid overly complex closures until you feel comfortable with basic construction techniques.
Carefully read through the entire pattern before cutting fabric. Understanding each step in advance prevents confusion later. Preparation is especially helpful when working with layered materials like interfacing and batting.
Use pins or clips generously when aligning layers. Multiple fabric layers can shift during sewing, so securing them properly ensures even seams. Accuracy at this stage contributes to a professional final product.
Take your time pressing seams. Pressing between steps may seem minor, but it dramatically improves the appearance of your project. Crisp edges and flat seams are hallmarks of well-executed sewing.
Test handle strength before using the carrier publicly. Place a weighted dish inside and gently lift to ensure stability. Reinforce any weak points immediately. Safety is just as important as aesthetics in a Pie Carrier Sewing Pattern.
Finally, embrace the learning process. Minor imperfections are natural, especially in early projects. Each time you create a pie carrier, your confidence and skill level will grow, making future versions even better.
About Pie Carrier Sewing Pattern
What is a Pie Carrier Sewing Pattern used for?
A Pie Carrier Sewing Pattern is designed to help you sew a reusable fabric carrier that safely transports pies and baked goods. It protects dishes during travel and adds a decorative handmade touch.
Is a Pie Carrier Sewing Pattern suitable for beginners?
Yes, many patterns are beginner-friendly. If you can sew straight seams and follow basic instructions, you can successfully complete this project.
What fabric works best for a Pie Carrier Sewing Pattern?
Durable cotton fabrics combined with interfacing and optional batting provide strength and structure. Prewashed quilting cotton is a common and reliable choice.
Can I wash my handmade pie carrier?
Most pie carriers made with cotton fabric are machine washable on a gentle cycle. Air drying helps preserve shape and structure.
How do I make my pie carrier more durable?
Reinforce handle attachment points, use high-quality thread, and incorporate interfacing or batting for additional support.
Can I sell items made from a Pie Carrier Sewing Pattern?
In many cases, yes, especially if the pattern allows small-scale handmade sales. Always review the pattern’s usage terms before selling finished products.
In this comprehensive guide to the Pie Carrier Sewing Patter, we explored material selection, construction steps, customization options, and beginner-friendly tips. You learned how to choose durable fabrics, reinforce handles, and assemble a structured carrier that combines practicality with style. We also discussed creative personalization ideas and answered common questions to help you feel confident in your sewing journey. A thoughtfully crafted Pie Carrier Sewing Pattern project not only protects your baked goods but also showcases your handmade talent. If you found this article helpful, please leave your honest opinion and share your suggestions. Your feedback is valuable and helps inspire future creative sewing projects.